Introduction to car audio deadning.
Introducing car audio deadning that can be done easily.
The term “deadening” is based on the English word “deaden”, and refers to adjusting the sound quality so that the door to which the speaker is mounted can be used as an enclosure (speaker box).
As a concrete work, we suppress unnecessary vibration of the door where the speaker is installed, and close the service hole (work hole opened in the iron plate of the door) so that sound does not leak.
This time, we will introduce an actual construction example using Honda Life (JB5) as an example.
It’s recommended because it’s easy and the sound is pretty good.
Details of deadening work
1. This is Honda life (JB 5) used this time.

2. Let’s start with deadening of the rear speaker.
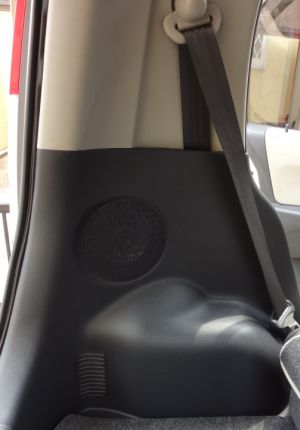
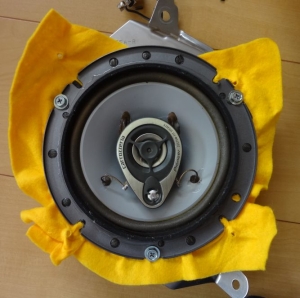
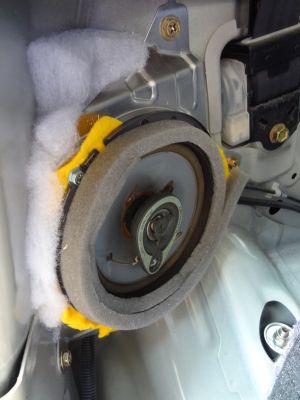
3. It is like this when the cover is removed. Once 17 cm diameter full range speaker (genuine) is sticking.
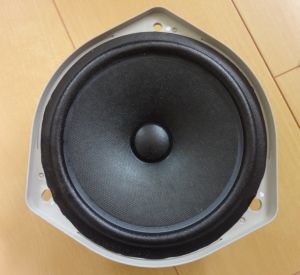
4. The removed speaker is like this.
5. There are magnets and coils when looking at the back.
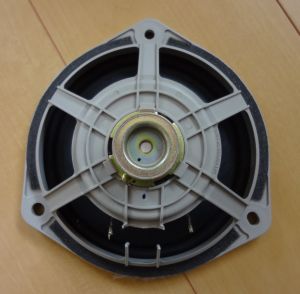
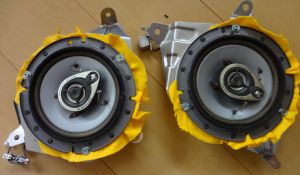
6. This is a used speaker (junk) to be replaced this time. We were able to just attach to pure baffle (metal fittings to which speaker was attached). The felt obtained from the 100 yen uniform shop is doubled between the speaker and the baffle.
7. It is the back side. In this way, soundproof measures are taken so that the sound coming out from the back does not leak. At the same time, a felt is sandwiched between the baffle and the speaker to increase the adhesion and prevent extra vibration. It is a measure of two birds with one stone with cheap felt.
8. We will construct this for the left and right speakers. The terminal part was diverted from the genuine speaker and soldered.
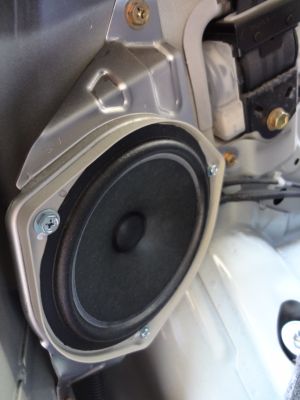
9. Replace the speakers. As you can see, there are many gaps, so you have to manage the gaps. If there is a gap, the sound emitted from the back of the speaker and the sound emitted from the entire surface of the speaker will interfere, causing peaks and valleys in the frequency characteristics.
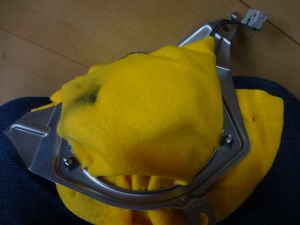
10. This is a photograph after the deadning of the rear speaker part has been installed. First of all, for the gap, the sound absorbing material is packed a little tighter to absorb the sound from the back of the speaker and suppress the extra resonance. Sound absorbing material such as “unnecessary towels” is OK. I don’t say the details of “the frequency of sound absorption”. It is important that the sound does not interfere anyway. Also, cover the speaker with a sponge so that the sound on the back and the sound on the front do not collide. (Completion of rear side deadning)
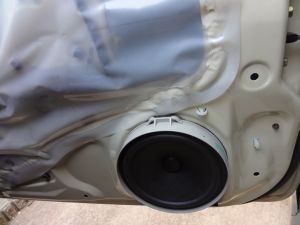
11. Now that the rear speakers have been deadned, the next step is to perform the front speakers.
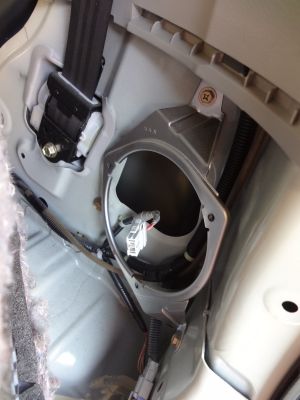
12. It is like this when the cover is removed. The service hole is originally closed, but this time it is simple, so leave the service hole as it is. Also, I didn’t get a good junk speaker, so I’m afraid I used the speaker as it is. And what to do. . .
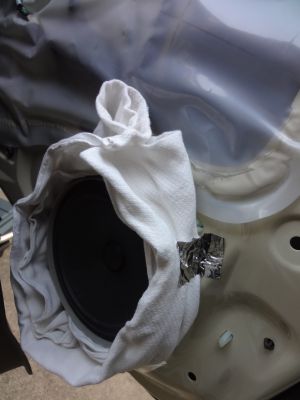
13. Surround the speakers with unnecessary towels. This is to prevent the sound on the back of the speaker from colliding with the sound on the front, but I wanted to take a stronger measure than a sponge, so I used an unnecessary towel. It is more like sound insulation than sound absorption. As for how much to enclose, please enclose it tightly so that it feels a bit tight when attaching the cover again. It is important that the sound does not interfere anyway.
14.When I tried listening to the sound after deadning, I installed a junk tweeter because the treble was not enough (genuine speakers do not produce treble). After all, adding a treble with a tweeter sounds better and better than seasoning with an equalizer. The tweeter volume is adjusted analogously at the mounting position. Of course, if you put it away from your ears, the volume of the treble will decrease, and if you move closer, the volume will increase. Surprisingly, these analog measures give good sound quality. Sound is more natural than Igil in an equalizer.
For now, the work of deadning is finished!
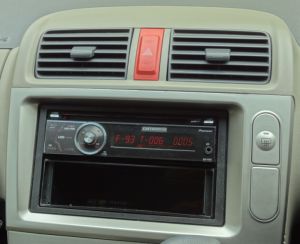
15.Finally, I will introduce the amplifier part. This is a fairly old 1DIN amplifier from Company P. The biggest advantage of this amplifier is that you can use a dedicated equalizer whose frequency and Q can be changed quite freely. In particular, it is good to be able to make detailed settings on the bass side. With the current settings, the center frequency is 80Hz and Q is the narrowest and used.
I don’t like using an equalizer so much, but I don’t have a woofer and just need the power of an equalizer to adjust the bass. It is not used simply to amplify the bass, but it is used to adjust the peak and valley of the bass part, so it must be an equalizer that can make quite fine settings.
I feel that many recent affordable 1DIN amplifiers have an equalizer only as a bonus and many products cannot be set in detail. Probably because there is no need from the user, I was troubled because there is no recommended 1DIN amplifier that can be purchased at an affordable price.
What happened to the sound after deadening?
Anyway, the sound is “clear”. I think that the main point of deadning is to minimize the interference between the sound on the back of the speaker and the sound on the front, so this effect is quite apparent. In the case of cars, road noise is around 300Hz, so if you want to emphasize bass with an equalizer, we recommend that you emphasize sounds below 100Hz.
By doing this, the frequency and sound of the road noise will not be overlaid, and you may feel that the bass is a bit unsatisfactory, but I think that it will be a good sound that does not get tired.
Don’t you think that the genuine car audio of recent cars has become much better? Not all cars know, but genuine audio for cars more than 10 years ago. Especially the speaker system was really terrible. Even now, the cost of the individual speaker is considerably reduced, so I think there is no big change, but the problem is the structure of the car door part that functions as the speaker enclosure, ignoring the acoustic characteristics, just the sound It felt like it was fine.
At that time, I was particular about sound quality, so I could not bear the sound of genuine car audio and made various efforts. I also did a lot of speaker exchanges, which are often said. I had written in various magazines that exchanging genuine speakers really improved the sound. I also heard quite a lot of people told me that the sound improved after replacing the speakers. So, I tried to change the speakers myself, and the sound was definitely better, but it was somehow unnatural.
As you can see now, the door to which the speaker is attached resonates and the specific frequency of the bass sounds like a “pon-pong” like a drum. This is like a bass reflex speaker with no frequency control at all. Since only certain frequencies are emphasized, the way in which the bass sounds depends on the sound source.
This led to the realization of the importance of deadning, saying, “I have to manage the door side, which is not a speaker but an enclosure.”
I think that the deadening method introduced this time can suppress the peak of the frequency of the “pong” sound to some extent. On the other hand, some people may feel that the sound of the bass sounding “pom-pom” is soft and unsatisfactory. But the goodness of this sound is clear when you listen for a long time. If you listen to the sound of the “pong-pong” bass sound, it sounds like a good sound because the bass sounds well, but if you listen for a long time it is very tired because it is an unnatural sound. In comparison, the sound with the deadning is similar to a natural sound without flowers, so it is a gentle sound that does not get tired even when driving a long distance.
Deadning is different for each car, so the same method described in this article may not always work. However, the points to be suppressed are the same, so it would be interesting to try and error in various ways.
I hope this article helps you a little.